Weblogic comes with a DemoIdentity and DemoTrust keystore as default keystores and it is ok to use them in DEV and TST environments but it is not recommended to use them in production environments. Using demo keystores in production posses risk to the security of your production environment as they only have a length of 1024 bit. Now a days 2048 bit key length is considered to be more secured.
Weblogic provides an option to use custom identity and custom trust store and it could be sometimes tricky as the demo keystores references are there at multiple places. SSL debugging will be really troublesome if these demo keystore reference are not removed properly. For e.g. you might be trying to invoke a webservice over SSL and also imported all the certificate in your custom trust store. That will still not work because Weblogic may still be referring to the demo trust store or the one comes with Java. So here I am listing the steps to configure custom identity and custom truststore.
Step -1 Create Identity Store
To create identity store we use keytool command. Actually here we will not only create identity store but will also generate a private key for our weblogic server. Below command does both.
keytool -genkeypair -alias serverCert -keyalg RSA -keysize 2048 -validity 3650 -keypass <private key password> -keystore IdentityKeystore.jks -storepass <keystore password>
Note the alias here is 'serverCert' and there are couple of passwords, one is private key password and another one is the password of keystore 'IdentityKeystore.jks'. On executing this command you will be presented with these questions -
What is your first and last name?
[Unknown]: <this is our CN and hostname must be entered here for e.g host1.mycompany.com>
What is the name of your organizational unit?
[Unknown]: Test Org unit
What is the name of your organization?
[Unknown]: TestOrg
What is the name of your City or Locality?
[Unknown]: HBG
What is the name of your State or Province?
[Unknown]: Skane
What is the two-letter country code for this unit?
[Unknown]: SE
Is CN=host1.mycompany.com, OU=Test Org Unit, O=TestOrg, L=HBG, ST=Skane, C=SE correct?
[no]: yes
Step-2 Create Sign Request
Next generate a certificate signing request with the private key that was created in earlier step. Run this command.
keytool -certreq -alias serverCert -file certreq.pem -keystore IdentityKeystore.jks
It will create a CSR file 'certreq.pem'. Once you provide this to CA they will sign and return signed certificate along with root and intermediate certificates if any.
Step-3 Import Signed Certificates
Now the signed certificates must be imported to the keystore. Note that the sequence of import must be root, intermediate and server signed certificate.
keytool -importcert -trustcacerts -alias root -file certs/RootCert.cer -keystore IdentityKeystore.jk
keytool -importcert -alias inter -file certs/IntermediateCert.cer -keystore IdentityKeystore.jks
keytool -importcert -alias serverCert -file certs/SignedCert.cer -keystore IdentityKeystore.jks
Note that while importing the signed certificate (last command) the alias name must be same as the private key. When successful it shows up the below message -
Step-4 Create TrustStore
Here as well the single command will create a trust store and also adds the trusted certificate into it.
keytool -importcert -trustcacerts -file Certs/RootCert.cer -alias root -keystore Truststore.jks
keytool -importcert -file Certs/Intermediate.cer -alias root -keystore Truststore.jks
Step-5 Point Weblogic to use Custom Keystore
Now that we have both custom identity and truststore ready, its time to change WebLogic to use these keystore. For this login to admin console and select 'Admin Server' in summary of servers page. Goto Configuration > Keystore and update identity and trust keystore with custom ones.
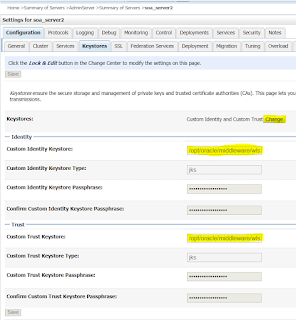
Also update the private key alias and passphrase.

Don't forget to set hostname verification to 'None' and enable JSSE SSL.

Step 6 - Update setDomainEnv.sh
Note that you need to remove the reference of DemoTrust from setDomainEnv.sh file. Either remove this entry from the EXTRA_JAVA_PROPERTIES or update it with the location of your custom trust store.
-Djavax.net.ssl.trustStore=${WL_HOME}/server/lib/DemoTrust.jks
If you are removing it then add the value in startup arguments of your admin and managed servers otherwise Weblogic will fall back on cacerts of Java as truststore.

To find out the location of trust store in force add the following lines in startup arguments -
-Dssl.debug=true -Djavax.net.debug=ssl
After performing all the above steps Weblogic is configured to use the custom identity and truststore. Import all the trusted certificates in custom truststore to achieve SSL related functions for e.g. to invoke a webservice over SSL first retrieve the certificates from the url and import all root, intermediate LB certificates in this truststore. Refer another post on this here.
Weblogic provides an option to use custom identity and custom trust store and it could be sometimes tricky as the demo keystores references are there at multiple places. SSL debugging will be really troublesome if these demo keystore reference are not removed properly. For e.g. you might be trying to invoke a webservice over SSL and also imported all the certificate in your custom trust store. That will still not work because Weblogic may still be referring to the demo trust store or the one comes with Java. So here I am listing the steps to configure custom identity and custom truststore.
Step -1 Create Identity Store
To create identity store we use keytool command. Actually here we will not only create identity store but will also generate a private key for our weblogic server. Below command does both.
keytool -genkeypair -alias serverCert -keyalg RSA -keysize 2048 -validity 3650 -keypass <private key password> -keystore IdentityKeystore.jks -storepass <keystore password>
Note the alias here is 'serverCert' and there are couple of passwords, one is private key password and another one is the password of keystore 'IdentityKeystore.jks'. On executing this command you will be presented with these questions -
What is your first and last name?
[Unknown]: <this is our CN and hostname must be entered here for e.g host1.mycompany.com>
What is the name of your organizational unit?
[Unknown]: Test Org unit
What is the name of your organization?
[Unknown]: TestOrg
What is the name of your City or Locality?
[Unknown]: HBG
What is the name of your State or Province?
[Unknown]: Skane
What is the two-letter country code for this unit?
[Unknown]: SE
Is CN=host1.mycompany.com, OU=Test Org Unit, O=TestOrg, L=HBG, ST=Skane, C=SE correct?
[no]: yes
Step-2 Create Sign Request
Next generate a certificate signing request with the private key that was created in earlier step. Run this command.
keytool -certreq -alias serverCert -file certreq.pem -keystore IdentityKeystore.jks
It will create a CSR file 'certreq.pem'. Once you provide this to CA they will sign and return signed certificate along with root and intermediate certificates if any.
Step-3 Import Signed Certificates
Now the signed certificates must be imported to the keystore. Note that the sequence of import must be root, intermediate and server signed certificate.
keytool -importcert -trustcacerts -alias root -file certs/RootCert.cer -keystore IdentityKeystore.jk
keytool -importcert -alias inter -file certs/IntermediateCert.cer -keystore IdentityKeystore.jks
keytool -importcert -alias serverCert -file certs/SignedCert.cer -keystore IdentityKeystore.jks
Note that while importing the signed certificate (last command) the alias name must be same as the private key. When successful it shows up the below message -
Certificate reply was installed in keystore
Step-4 Create TrustStore
Here as well the single command will create a trust store and also adds the trusted certificate into it.
keytool -importcert -trustcacerts -file Certs/RootCert.cer -alias root -keystore Truststore.jks
keytool -importcert -file Certs/Intermediate.cer -alias root -keystore Truststore.jks
Step-5 Point Weblogic to use Custom Keystore
Now that we have both custom identity and truststore ready, its time to change WebLogic to use these keystore. For this login to admin console and select 'Admin Server' in summary of servers page. Goto Configuration > Keystore and update identity and trust keystore with custom ones.

Also update the private key alias and passphrase.

Don't forget to set hostname verification to 'None' and enable JSSE SSL.

Step 6 - Update setDomainEnv.sh
Note that you need to remove the reference of DemoTrust from setDomainEnv.sh file. Either remove this entry from the EXTRA_JAVA_PROPERTIES or update it with the location of your custom trust store.
-Djavax.net.ssl.trustStore=${WL_HOME}/server/lib/DemoTrust.jks
If you are removing it then add the value in startup arguments of your admin and managed servers otherwise Weblogic will fall back on cacerts of Java as truststore.

To find out the location of trust store in force add the following lines in startup arguments -
-Dssl.debug=true -Djavax.net.debug=ssl
After performing all the above steps Weblogic is configured to use the custom identity and truststore. Import all the trusted certificates in custom truststore to achieve SSL related functions for e.g. to invoke a webservice over SSL first retrieve the certificates from the url and import all root, intermediate LB certificates in this truststore. Refer another post on this here.


